In the ever-evolving world of financial markets, traders continually seek tools and strategies to gain an edge. Among these, understanding demand and supply zones has become a cornerstone for many successful traders. These zones, which represent areas of significant buying or selling interest, are essential for predicting potential price reversals or continuations. Let’s delve into the concept of demand and supply zones, their significance, and how to use them effectively in your trading strategy.
What Are Demand and Supply Zones?
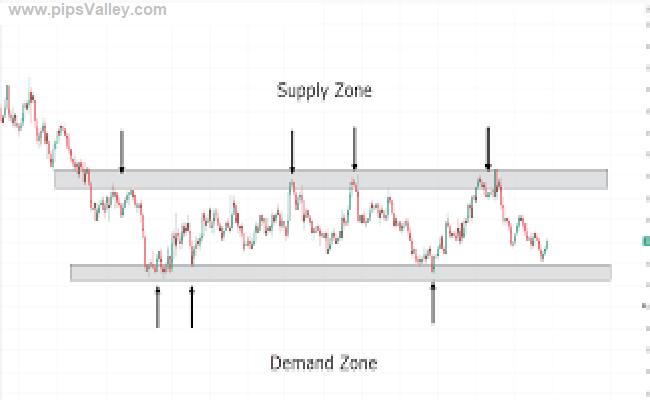
Demand Zone: A demand zone is a price area where buying interest is strong enough to halt a downtrend and potentially reverse it. It is often characterized by a cluster of bullish candles or a sharp upward price movement originating from the zone.
Supply Zone: Conversely, a supply zone is a price area where selling pressure outweighs buying interest, causing the price to pause or reverse downward. These zones are marked by a cluster of bearish candles or a sharp downward price movement originating from the zone.
Why Are Demand and Supply Zones Important?
Key Decision Points: These zones indicate where market participants have historically made significant buying or selling decisions. Understanding these levels provides insight into market psychology.
High Probability Setups: Trading near demand or supply zones often offers high-probability entry points with favorable risk-reward ratios.
Market Reversals: Recognizing these zones can help traders anticipate potential reversals or continuations in price trends, enabling better timing for trades.
How to Identify Demand and Supply Zones
Identifying these zones requires careful observation of price charts. Here’s a step-by-step approach:
Locate Strong Price Movements: Look for areas where the price has moved sharply upward (demand zone) or downward (supply zone). These movements indicate strong buying or selling interest.
Mark the Base: Identify the base from which the sharp movement originated. This is typically a consolidation area or a series of small candles before the significant price move.
Validate the Zone: Check for repeated price reactions to the zone. A strong zone will often see price respect it multiple times.
How to Trade Using Demand and Supply Zones
Entering Trades: When the price approaches a demand zone, consider looking for bullish confirmation signals, such as candlestick patterns or oscillators showing oversold conditions. For supply zones, seek bearish confirmation signals.
Stop-Loss Placement: Place your stop-loss slightly below the demand zone for buy trades and slightly above the supply zone for sell trades to minimize risk.
Take-Profit Targets: Use nearby resistance or support levels as potential take-profit targets, or trail your stop to capture larger moves.
Common Mistakes to Avoid
Ignoring Context: Always consider the broader market trend and combine demand and supply zones with other technical or fundamental analysis tools.
Overloading Indicators: Don’t clutter your charts with too many indicators. Focus on clear and well-defined zones.
Forgetting Risk Management: Even the best setups can fail. Always use proper risk management to protect your capital.
Mastering demand and supply zones can transform your trading approach, offering clarity in a market often characterized by uncertainty. By identifying these critical areas and using them strategically, traders can enhance their decision-making and achieve more consistent results. Remember, like any trading tool, practice and experience are key to effectively utilizing demand and supply zones. With patience and discipline, you can unlock the full potential of this powerful concept in your trading journey. Click to Sign up with Fusion Markets.
Related Post:
Top 5 Strategies for Consistently Profitable Forex Trading


